Hey folks, today I’m going to show you how to make an awesome little soil moisture indicator for your indoor house plants using The Raspberry Pi Pico and CircuitPython so you never forget to give your ferns a little drink.
I’ve also written a sweet little bit of code that will automagically calibrate the sensor for you so you don’t need to spend too much time fiddling around to get everything up and running.
What you’ll need:
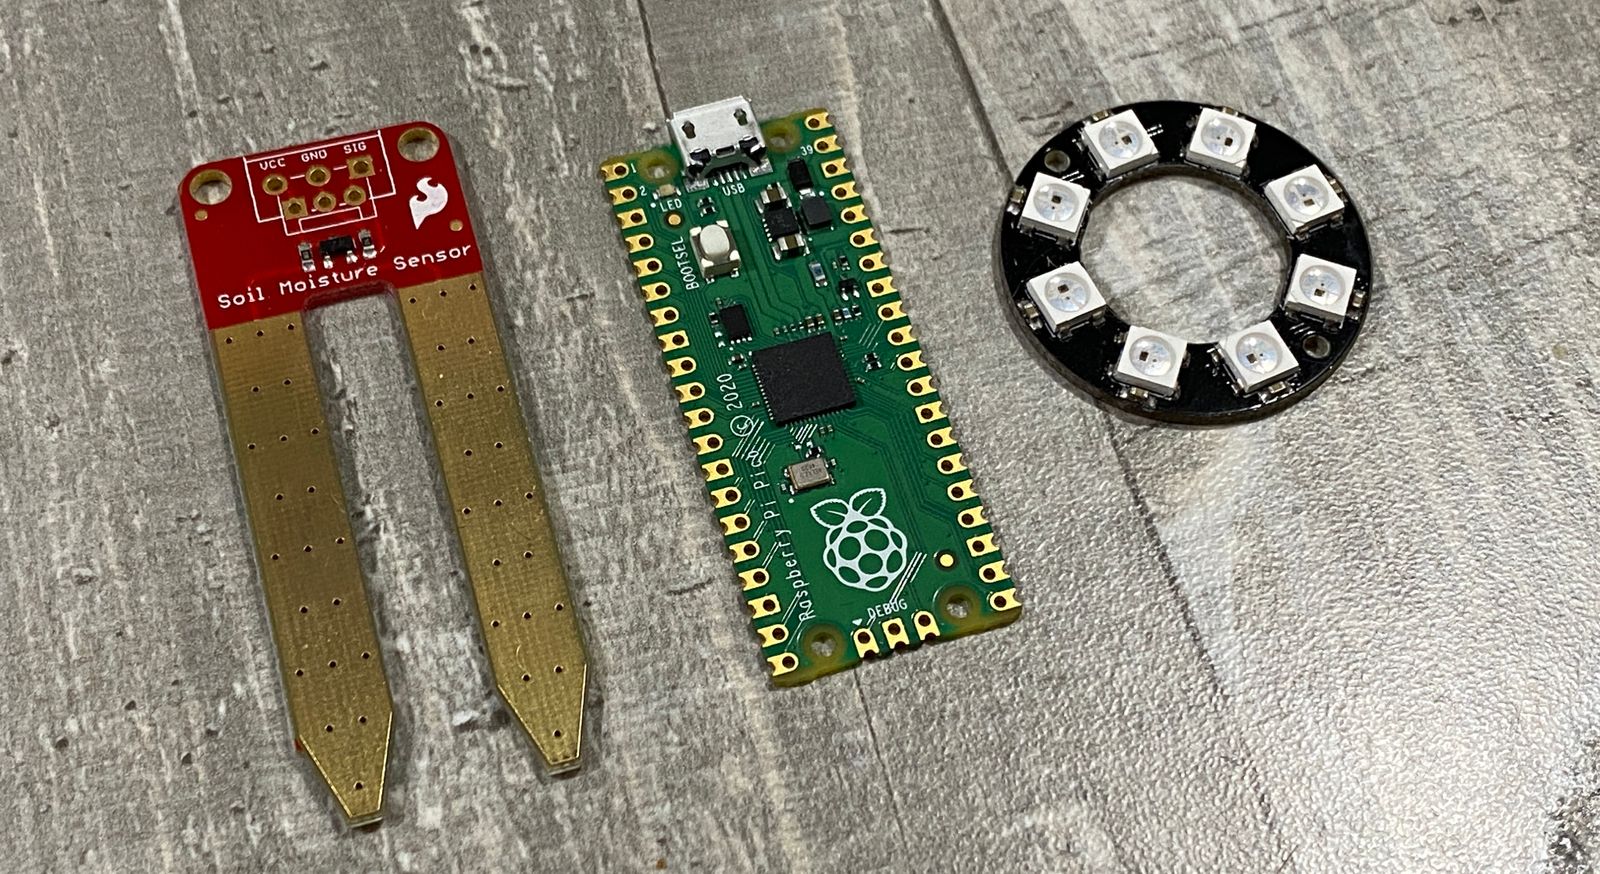
- A snazzy little Raspberry Pi Pico
- A Sparkfun Soil Moisture Sensor
- A WS2812B (aka Neopixel) ring or strip
- Some solid core wire
- Micro USB cable
Note: You don’t have to use a Pi Pico to build this project, there are many many boards that can run CircuitPython. A great alternative would be the Adafruit QTPy which is teeny tiny and has everything you need to run a project like this. There are also many alternatives to the moisture sensor I used, although you may need to alter your code.
Putting it together:
For the purpose of this article, I’m going to assume you have a basic grasp on trimming wires and soldering (If not, there are many great tutorials on YouTube!).
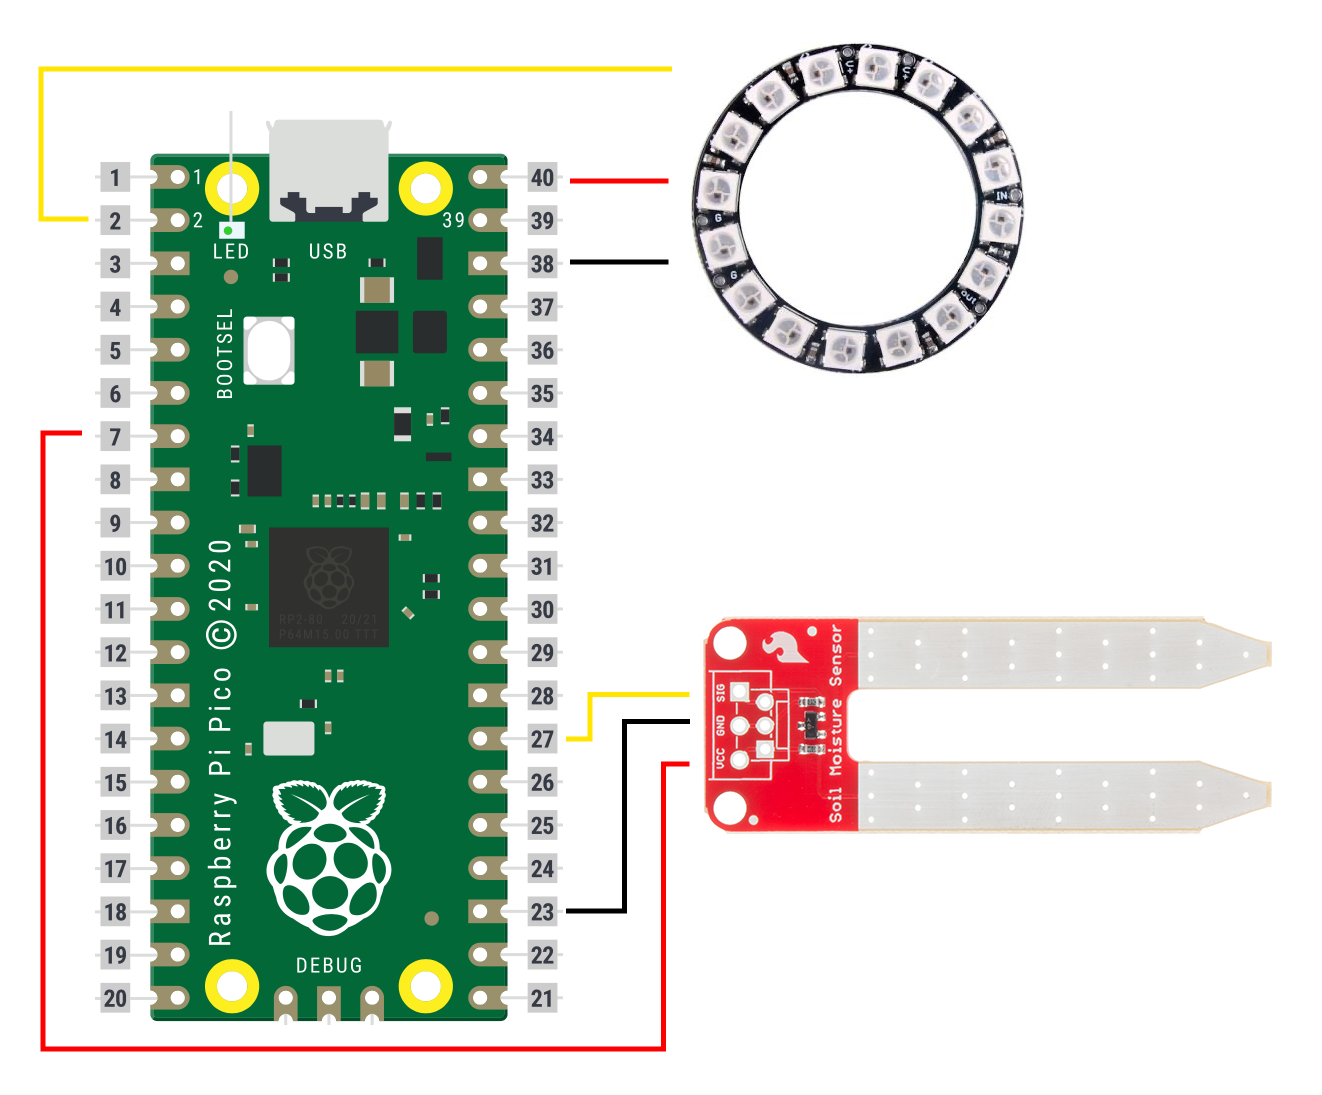
I’m too lazy to learn Fritzing so I did it in Figma instead
We’ll be using the following pins on the Raspberry Pi Pico:
- Pin 2 – Data signal for Neopixel ring
- Pin 7 – Power for Moisture sensor
- Pin 40 – Power for Neopixel ring (direct from USB port)
- Pin 38 – Ground for Neopixel ring
- Pin 27 – Analog signal for moisture sensor
- Pin 23 – Ground for moisture sensor
Connect everything up as per the diagram above. I chose to keep my wires short and sweet but if you prefer you can use longer wires depending on your setup. I used a 16 LED neopixel ring, but you can use a smaller ring, a single neopixel jewel or a full neopixel strip depending on what you have on hand or what you want to illuminate.
Once you’ve got everything working and tested, you may want to take the time to waterproof your electronics somewhat if you want it to last longer. Just be sure not to waterproof the gold forks or you’ll never get a reading!
The next step, is to setup CircuitPython on your Raspberry Pi Pico. This is pretty straight forward and Adafruit has written a brilliant guide on their learning system.
Next you’ll need to download the CircuitPython library bundle, and copy the neopixel.mpy file into the lib folder on your Raspberry Pi Pico.
Finally, you’ll need to copy the code below and paste it into the code.py file on your Raspberry Pi Pico. If you’re interested in what it does, I’ve commented the code as clearly as I can.
The code:
import time
import board
import neopixel
from analogio import AnalogIn
from digitalio import DigitalInOut, Direction, Pull

# how frequently to take readings
DELAY = 600

# Update this to match the number of NeoPixel LEDs connected to your board.
num_pixels = 16

# setup the moisture sensor power pin and turn it off by default
sensor_power = DigitalInOut(board.GP7)
sensor_power.direction = Direction.OUTPUT
sensor_power.value = False

# set the analog read pin for the moisture sensor
sensor_signal = AnalogIn(board.GP27)

# set up the noepixels
pixels = neopixel.NeoPixel(board.GP2, num_pixels, auto_write=False)
pixels.brightness = 0.2

# some variables for internal use, you shouldn't have to worry about them
calibrate_count = 0
auto_calibrate = True
SENSOR_MAX = 0
SENSOR_MIN = 9999

# set the neopixels to blue
for i in range(num_pixels):
    pixels[i] = (0,0,255)
pixels.show()

print("=============")
print("calibrating sensor")
print("=============\n\n")

while True:

    if auto_calibrate == True:

        # enable the sensor power
        sensor_power.value = True

        # take a reading from the sensor and make it a little easier to read
        value = round(sensor_signal.value / 100)

        # disable the sensor power
        sensor_power.value = False

        print("reading:", value)

        if value > SENSOR_MAX:
            SENSOR_MAX = value

        if value < SENSOR_MIN:
            SENSOR_MIN = value

        calibrate_count += 1

        if(calibrate_count > 100):
            print("\n-------------------")
            print("MIN:", SENSOR_MIN)
            print("MAX:", SENSOR_MAX)
            print("-------------------\n")
            time.sleep(5)

            # wipe pixels
            for i in range(num_pixels):
                pixels[i] = (0,0,0)
            pixels.show()

            auto_calibrate = False

        time.sleep(0.2)

    else:

        # take a reading from the sensor and make it a little easier to read
        value = round(sensor_signal.value / 100)
        print("reading:", value)

        # disable the sensor power
        sensor_power.value = True

        # crazy math to turn value into percentage
        percent = round(((value - SENSOR_MIN) / (SENSOR_MAX - SENSOR_MIN)) * 100)
        print("Percent:", percent)

        # more crazy math to convert percentage to number of pixels
        show_leds = round(100 / (100 / num_pixels) * percent / 100)
        print("leds to show:", show_leds)

        # print values for the plotter
        print((value, percent, show_leds))

        # change colour depending on quantity
        if(show_leds < 8):
            color = (255,0,0)
        else:
            color = (0,255,0)

        # make sure we don't ever try to show more leds than we have
        # because that will crash the script
        if(show_leds > num_pixels):
            show_leds = num_pixels

        # if water levels are critically low, show them all
        if(show_leds <= 3):
            show_leds = num_pixels

        # wipe pixels
        for i in range(num_pixels):
            pixels[i] = (0,0,0)

        # turn on neopixels
        for i in range(show_leds):
            pixels[i] = color

        pixels.show()

        # wait for required delay
        time.sleep(DELAY)

        print("\n-------------------\n")
How to use it
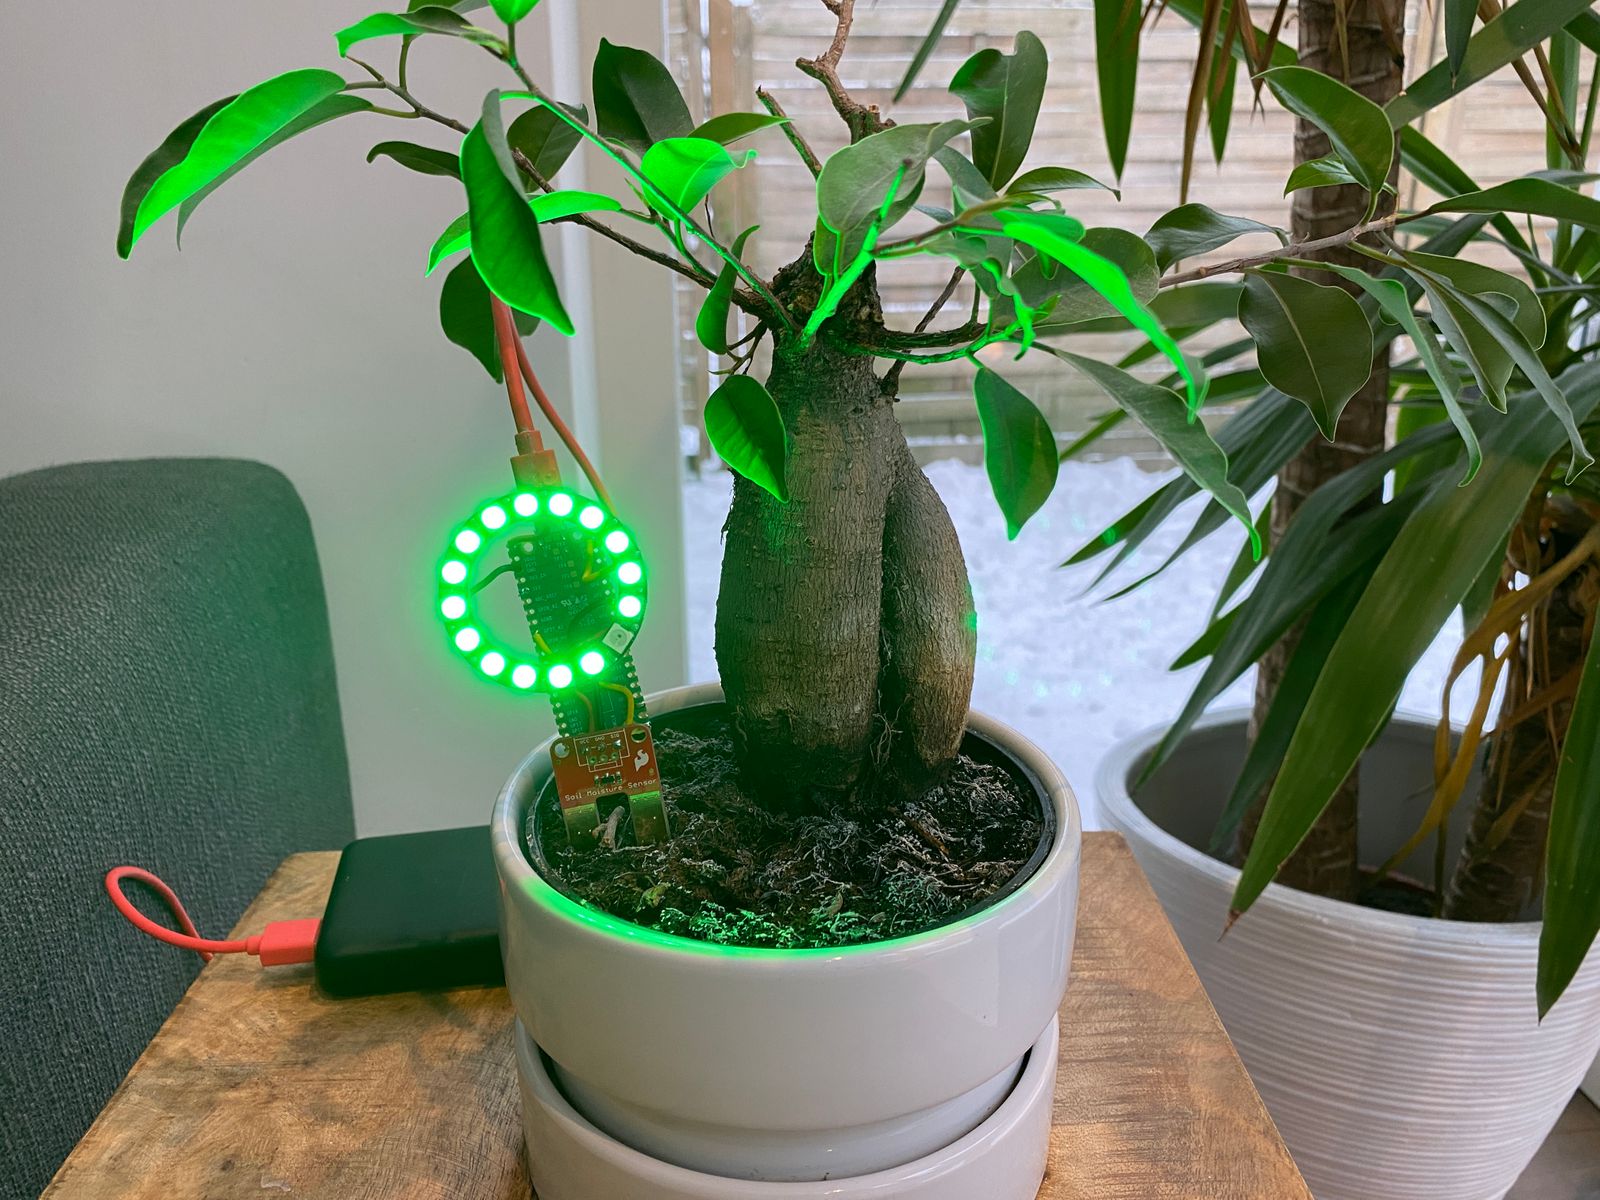
IF you did all of the above correctly, and there are no bugs in my code, once you unplug the Pico from your computer and plug it into a normal USB power source you should see your Neopixel ring turn blue! This means your ring is in “calibration mode”. Here’s how to calibrate your sensor:
Due to the way the moisture sensor works, the exact readings you get from the device can vary depending on a number of conditions such as how pure your water supply is and the mineral content of the soil in use and so we have to calibrate the sensor before we can get reliable readings. Normally you would have to do this manually by changing some values in the code, but I’ve added some code that makes it as simple as watering your plant and putting it in the soil.
Let’s do this.
Start by making sure the gold “fingers” on the sensor are completely dry, water your plant to it’s “perfect” moisture settings as you normally would and then plug your Pico sensor into the power. The device will quickly boot up and the ring will turn blue. Give it about 5 seconds and then stick the forks into the soil, ensuring the rest of the components are above soil height. These two positions will give the sensor it’s minimum and maximum values that it uses to calculate everything else.
After a moment or two, the ring should fill up with green, letting you know that the moisture level is around “maximum”. As the moisture drops over time, the ring will begin losing lights, eventually turning to red at around “half way to dry”. When the soil becomes significantly dry, it shoud turn completely red to let you know it’s really time to give your plant a little drinky.
And thats all there is to it! If you have any questions or feedback, feel free to tweet me @andy_came_back on Twitter and I’ll be happy to help. I would love to see pics of your Pico Moisture sensors in their leafy new homes so don’t hesitate to share with me either on Twitter or Instagram!
Credits:
Thanks to Adafruit for their awesome “getting started with CircuitPython on Raspberry Pi Pico” guide (and all the love they put into CircuitPython) and SparkFun for the Soil Moisture Sensor Guide which gave me a lot of tips that made working with this sensor much easier! Finally, of course, thanks goes to the Raspberry Pi Foundation for this awesome little low-cost microcontroller and all the work they’ve done making the Raspberry Pi ecosystem so awesome!